Contents
|
csa102 Redundancy and Failover
Objective
This sample demonstrates basic HA (High Availability) and SU (Service Unit) fail-over functionality. The application has two components, both processing the same workload as csa101, that is, repeatedly printing "Hello World". The difference, however, is that in this case there is now an active component and a standby component, with only the active component performing the printing function.
csa102 is quite similar to csa101, and this section will discuss the areas in which they deviate.
What you will learn
- Keeping track of HA states and how to respond to callbacks requesting HA state changes.
How to create new Project Model csa102
The first step in setting up our example is to create a model which represents the system that we will eventually deploy. This is done through the SAFplus Platform IDE. In this chapter we will step through the following tasks:
- Create a project area
- Launch the SAFplus Platform IDE
- Create the IDE project
- Specify the Resource model for csa102(the types of physical hardware in our system)
- Specify the Component model (the types of components or applications in our system)
- Specify which Components run on which Resources
- Specify important build and boot parameters
Creating a New Project Area
A project area is a directory on your system where you can develop SAFplus Platform models and generate the code corresponding to those models. This is same as created for csa101.
Create a project area using a script from the command line. To create a project area named projectarea1 in the /home/clovis directory you should execute the following command:
# cl-create-project-area /home/clovis/projectarea1
Launching the SAFplus Platform IDE
You can launch the SAFplus Platform IDE from the command line. If you chose to create symbolic links during installation you can simply enter cl-ide from any directory. If you did not create symbolic links during installation you can either:
- Add the installation directory to the shells search path and then launch the IDE as follows:
- Start cl-ide by specifying the full path
# cl-ide
The splash screen for SAFplus Platform IDE is displayed as illustrated in Figure SAFplus Platform IDE Opening Screen.
You will then be prompted to select a workspace in which to do your work as illustrated in Figure SAFplus Platform IDE Workspace Launcher.
The workspace you select should correspond to the project area that you created in the previous section (in this case "/home/clovis/projectarea1"). Note that the workspace includes a subdirectory of "/ide_workspace". This is done strictly for organizational purposes. It keeps the IDE models separate from the generated SAFplus Platform models and code. Select the workspace and click OK to launch SAFplus Platform IDE.
The SAFplus Platform IDE is launched and you are now looking at the main work area. For more information about the components of this main work area including the SAFplus Platform IDE menu and toolbar, see SAFplus Platform IDE User Guide.
Creating the Sample Project
We will now create a project within the SAFplus Platform IDE. This project will hold both the resource model and the component model csa102 for our example system. The resource model is a physical view of the resources (the chassis, the blade types, etc.) in our system. The component model is a logical view of the components (applications, etc.) in our system.
We will be using the New Project Wizard to create our project. The wizard captures some high-level information about the system that we are building and performs a lot of the basic setup for us.
![]() The same model that we are building through the wizard could also be created manually through the Resource and Component Editors. For more information on the Resource and Component Editors see SAFplus Platform IDE User Guide.This step is similar compared to csa101.
The same model that we are building through the wizard could also be created manually through the Resource and Component Editors. For more information on the Resource and Component Editors see SAFplus Platform IDE User Guide.This step is similar compared to csa101.
To launch the New Project Wizard select File > New > Project from the IDE menu bar.
The New Project Wizard is displayed and Clovis System Project is selected by default as illustrated in Figure New Project Wizard.
Click Next. The Clovis System Project window is displayed as illustrated in Figure Clovis System Project.
Enter the following information (These steps are similar compared to csa101):
- Project Name : Enter the name of your new project as SampleModel.
Do not use spaces or special characters for the project name. The project name can be alphanumeric, but cannot start with a number or have only numbers.
Select Use default to use the same directory mentioned in the Directory field. - SDK Location: Enter the location where the SAFplus Platform SDK was installed. For e.g. if the SDK was installed at location /opt/clovis, then the SDK location is /opt/clovis/sdk-<version>.
- Project Area Location: Enter the location where the generated source code for the model should be stored.
This can be any existing directory but is usually the project area that was created in the previous section. - Python Location: Enter the location where Python 2.5.0 is installed on your system. If Python 2.5.0 was installed by SAFplus Platform SDK, the directory is
<installation_directory>/buildtools/local/bin.
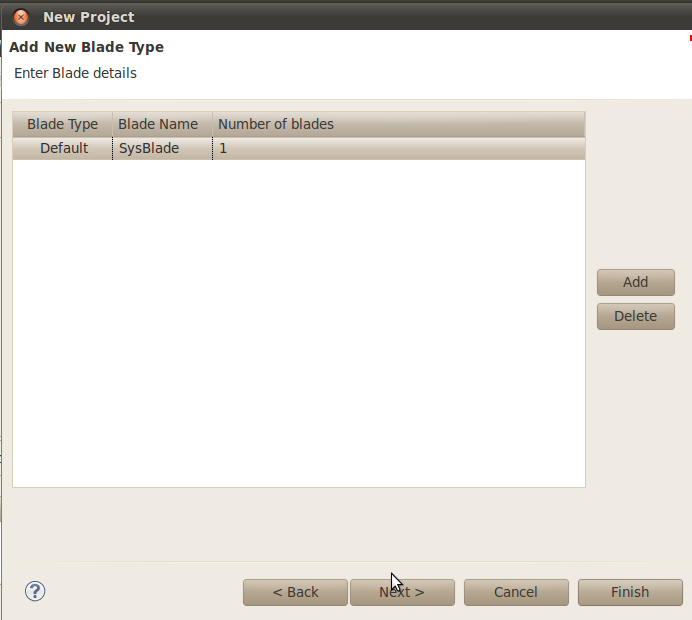
Click Next. The Add New Blade Type window is displayed. This dialog is used to define the blade types that are in our system.
Remember that the system we are modelling has only one blade type...a System Controller.
- Use the Add button to add a new blade type to the list. Name this blade type 'SysBlade' (for System Controller blade).
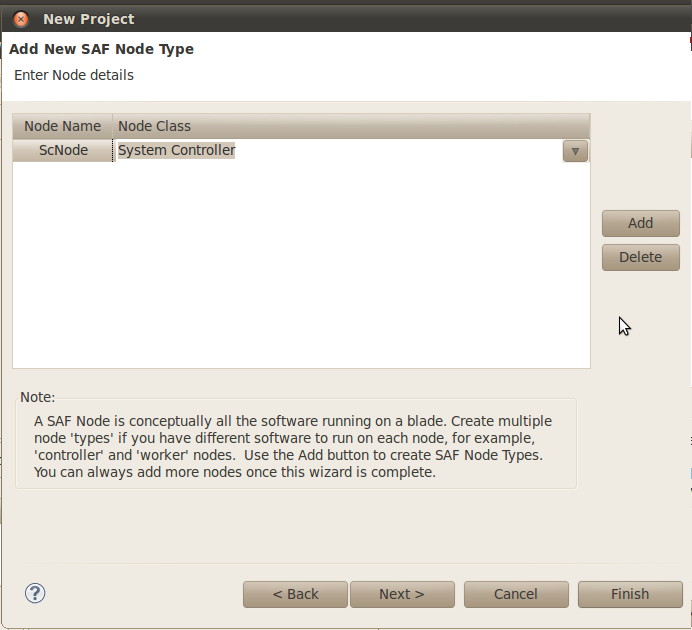
Click Next. The Add New SAF Node Type window is displayed. This dialog is used to define the type of logical node that will be run on the corresponding blade type defined in the previous dialog.
Node types represent groups of software. They are classified as either a System Controller class or a Payload class. This distinction gives the node type certain characteristics which cause it to behave in a well-defined manner. Since we have only a System Controller in our system we will add a node type of class System Controller.
- Use the Add button to add a new node type to the list. Name the node type 'SCNode' and ensure that its node class is 'System Controller (SAF Class B)'.
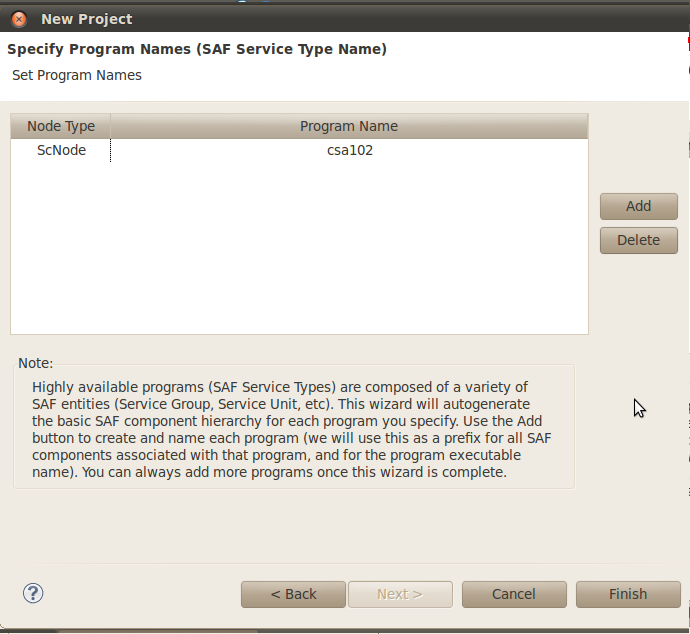
Click Next. The Specify Program Names window is displayed. This dialog is used to create programs or SAF Service Types and associate them with the SAF Node Types specified in the previous dialog.
In our system we need one SAF Service Type which represents our high availability software (csa102 continuously prints "Hello World!" redundantly).
- Use the Add button to add a program name to the list. Change the program name to 'csa102' and associate the program with the 'SCNode' node type.
Click Finish. This will create the sample model using the blade type, node type, and program name information collected through the 'New Project Wizard' dialogs.
Configuring the Service Group
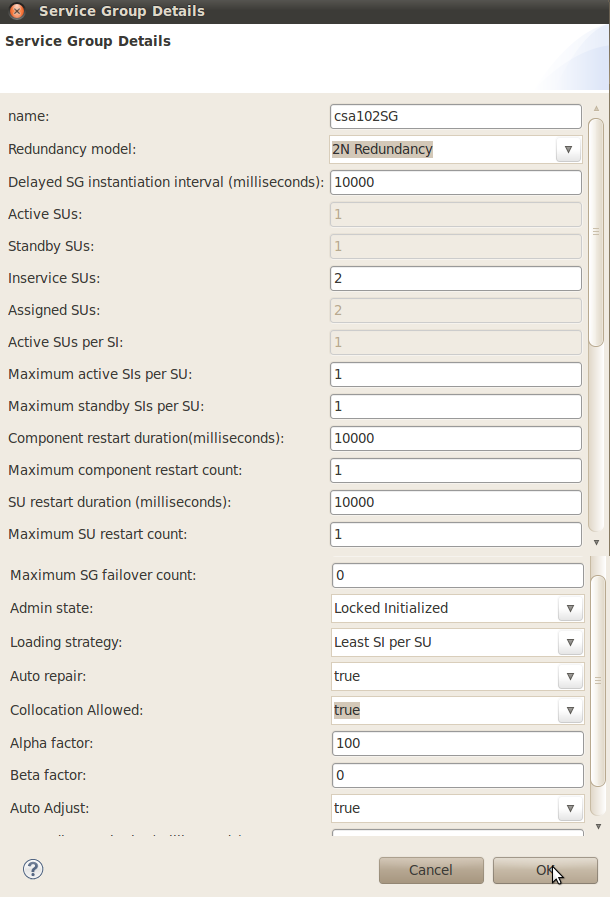
To make changes to the Service Group double-click on the box titled csa101SG. The Service Group Details dialog is displayed.
- The first change we want to make is to the Redundancy Model. The Redundancy Model is the strategy that is used by the SAFplus Platform system to recover from a node failure. For our redundant model (which only has one node with one Active component and another standby component used for redundancy) change the Redundancy Model to '2N Redundancy' as shown.
 You will notice that when you change the redundancy model some of the other fields are modified automatically and become read-only. This is to ensure integrity of the redundancy models.
- The second change that we want to make is to the Admin State. The Admin State defines the state of the component when the system is first brought up. In our case we want to change the Admin State to be 'Locked Initialized'. This means that when the system first starts up this Service Group (and its subcomponents) will be initialized but not yet put into a running state. So our csa102 application will not yet start printing "Hello World!".
- The third change that we want to make is to the Auto repair. The Auto repair defines the state of the component to be achieved after failure of the component. So our csa102 application will not yet start printing "Hello World!".
- When you are finished making the changes click the OK button to commit the changes.
Configuring the SAF Component
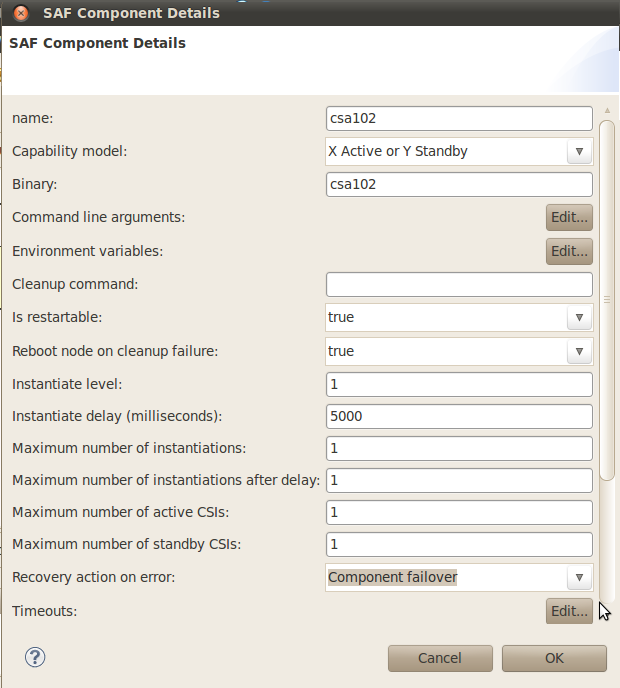
To make changes to the SAF Component double-click on the box titled csa102. The SAF Component Details dialog is displayed.
To make the model to recover from failure by Stand-by component, the field Recovery action on error needs to be changed to Component fail over.
The SAF Component represents our high availabilty program or executable. We need to pass a command line argument to this executable. The reason for this argument is to force the program to print the 'Hello World!' output to a special log file for our viewing. We will look at this more closely when we customize our code.
Configuring Physical Instances
The configuration of our logical models is complete. During this process we have defined all of the 'types' of objects in our system. Now it is time to configure actual instances of those objects so that they can be built and deployed.
Object instance configuration is done through the Availability Management Framework (AMF) via the AMF Configuration dialog.
- To launch this dialog go to the the Clovis menu and select AMF Configuration...
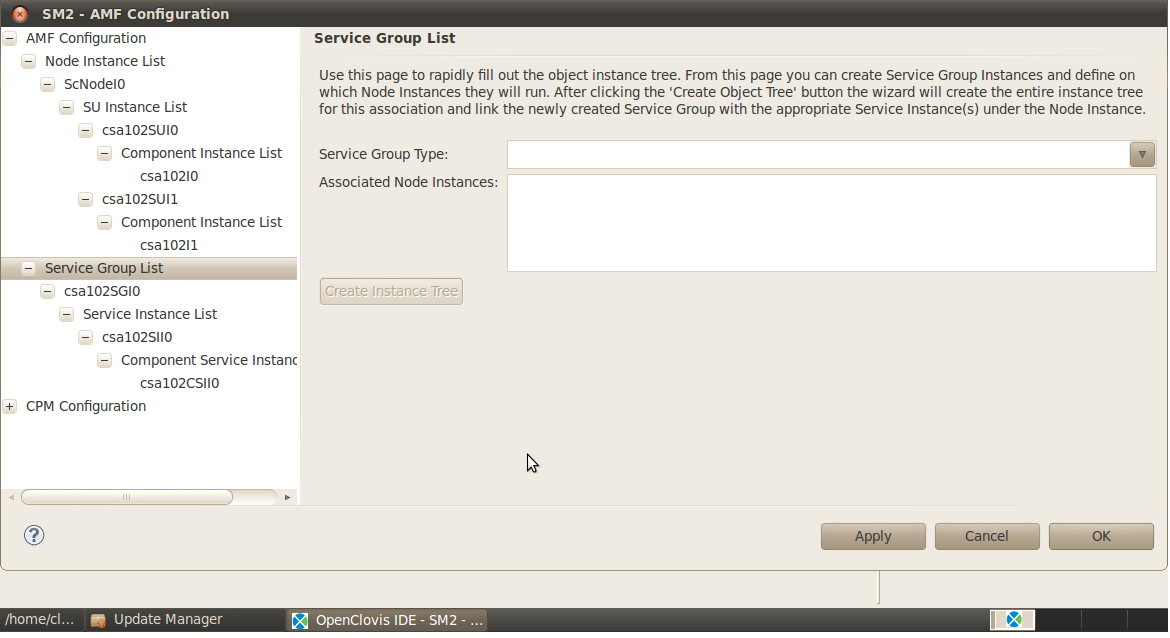
The AMF Configuration window will be displayed. If you now completely expand the AMF Configuration branch of the tree in the left-hand pane you will see the following.
Code
The code can be geneteted using the same steps as mentioned for csa101. The genetated code can be found within the following directory
<project-area_dir>/eval/src/app/csa102Comp
This sample component is implemented in a few C modules that are quite similar to the csa101 module. We will discuss the additions in detail.
We change the logging from the default "application" stream to a custom stream. To do this, we include the header that defines our config routines, change the default "clLogApp" macro to use a different stream, and define that stream as a global variable:
| clCompAppMain.c |
|---|
|
Next, the log stream is initialized in the application's "main" function:
| clCompAppMain.c |
|---|
|
This function is implemented in the src/app/ev.c file.
As with csa101, the clCompAppAMFCSISet() function is called to set the component's HA state, and the following block of code assigns this requested state to the component, while verbosely detailing this process:
| clCompAppMain.c |
|---|
|
In this case the application spawns a thread when it is assigned active which is a very common strategy for threaded applications. It also sets a global variable "running" to true. When the application is "quesced" -- that is when the active work assignment is taken away -- the application sets this global variable back to 0 to trigger the active thread to quit itself. The thread is simply defined as:
| clCompAppMain.c |
|---|
|
The example also demonstrates a non-threaded approach. But first, some background: for both threaded and non-threaded applications, the main must have a "dispatch" loop that handles incoming AMF notifications and calls the relevant callback. So to implement a single threaded SAF aware application, the programmer must modify this dispatch loop adding active (and potentially standby) functionality:
| clCompAppMain.c |
|---|
|
This code should be very familiar to anyone who has written single threaded "event loop" style code. As can be seen in the code snippet above, the select is given an idle timeout (in a real application the timeout would be much smaller) and the application only calls saAmfDispatch if the select actually indicates that the there is data in the FD. Then it falls down into an "if" statement that checks if we are active "if (running)..." and outputs a log if that is the case.
How to Run csa102 and What to Observe
As with the csa101 example we will use the SAFplus Platform Console to manipulate the administrative state of the csa102 service group.
- Start the SAFplus Platform Console
 # cd /root/asp/bin
 # ./asp_console
- Then put the csa102SGI0 service group into lock assignment state using the following commands.
 cli[Test]-> setc 1
 cli[Test:SCNodeI0]-> setc cpm
 cli[Test:SCNodeI0:CPM]-> amsLockAssignment sg csa102SGI0
Because example 102 has two components there will be two application log files to view. These are
/root/asp/var/log/csa102CompI0Log.latestand/root/asp/var/log/csa102CompI1Log.latest. Viewing these application logs using thetail -f, you should see the following./root/asp/var/log/csa102CompI0Log.latest Sun Jul 13 22:38:17 2008 (SCNodeI0.13418 : csa102CompEO.---.---.00029 : INFO) Component [csa102CompI0] : PID [13418]. Initializing Sun Jul 13 22:38:17 2008 (SCNodeI0.13418 : csa102CompEO.---.---.00030 : INFO) IOC Address : 0x1 Sun Jul 13 22:38:17 2008 (SCNodeI0.13418 : csa102CompEO.---.---.00031 : INFO) IOC Port : 0x80 Sun Jul 13 22:38:17 2008 (SCNodeI0.13418 : csa102CompEO.---.---.00032 : INFO) csa102: Instantiated as component instance csa102CompI0. Sun Jul 13 22:38:17 2008 (SCNodeI0.13418 : csa102CompEO.---.---.00033 : INFO) csa102CompI0: Waiting for CSI assignment...//root/asp/var/log/csa102CompI1Log.latest Sun Jul 13 22:38:18 2008 (SCNodeI0.13422 : csa102CompEO.---.---.00028 : INFO) Component [csa102CompI1] : PID [13422]. Initializing Sun Jul 13 22:38:18 2008 (SCNodeI0.13422 : csa102CompEO.---.---.00029 : INFO) IOC Address : 0x1 Sun Jul 13 22:38:18 2008 (SCNodeI0.13422 : csa102CompEO.---.---.00030 : INFO) IOC Port : 0x81 Sun Jul 13 22:38:18 2008 (SCNodeI0.13422 : csa102CompEO.---.---.00031 : INFO) csa102: Instantiated as component instance csa102CompI1. Sun Jul 13 22:38:18 2008 (SCNodeI0.13422 : csa102CompEO.---.---.00032 : INFO) csa102CompI1: Waiting for CSI assignment... - Next, unlock the service group using the following SAFplus Platform Console command.
# cli[Test:SCNodeI0:CPM]-> amsUnlock sg csa102SGI0
and in the /var/log/csa102CompI*.log files we should see:
/root/asp/var/log/csa102CompI0Log.latest Sun Jul 13 23:00:18 2008 (SCNodeI0.13422 : csa102CompEO.---.---.00487 : INFO) csa102: Hello World! . Sun Jul 13 23:00:19 2008 (SCNodeI0.13422 : csa102CompEO.---.---.00488 : INFO) csa102: Hello World! . Sun Jul 13 23:00:20 2008 (SCNodeI0.13422 : csa102CompEO.---.---.00489 : INFO) csa102: Hello World! . Sun Jul 13 23:00:21 2008 (SCNodeI0.13422 : csa102CompEO.---.---.00490 : INFO) csa102: Hello World! . Sun Jul 13 23:00:22 2008 (SCNodeI0.13422 : csa102CompEO.---.---.00491 : INFO) csa102: Hello World! . Sun Jul 13 23:00:23 2008 (SCNodeI0.13422 : csa102CompEO.---.---.00492 : INFO) csa102: Hello World! .
/root/asp/var/log/csa102CompI1Log.latest Sun Jul 13 22:43:00 2008 (SCNodeI0.13422 : csa102CompEO.---.---.00043 : INFO) csa102: New state is not the ACTIVE; deactivating service
These can be watched in a separate terminal window using
tail -f. csa102CompI0 is the active component in this case, and csa102CompI1 is the standby. Consequently, the "Hello world!" lines appear in csa102CompI0.log and not in csa102CompI1.log. They will continue to be logged to that file until the HA state of that component changes, for example, when the process logging those lines is killed. In the mean time the standby component: csa102CompI1 just waits until it is told that it should take over the workload.
Changing the HA state of the Client/Server
The easiest way to test component fail-over is to kill the process associated with the active component using the kill command. For this you need to know the process ID of the active component. To find the process ID issue the following command from a bash shell.
# ps -eaf | grep csa102
This should produce an output that looks similar to the following.
root     15872 15663  0 13:49 ?        00:00:01 csa102Comp -p
root     16328 15663  0 13:56 ?        00:00:00 csa102Comp -p
root     17304 16145  0 14:11 pts/4    00:00:00 grep csa102
Notice the two entries that end with csa102Comp -p. These are our two component processes. The first one is usually the active process. This is the one that we will kill. In this case the process ID is 15872. So to kill the active component you issue the command:
# kill -9 15872
![]() If this step does not result in the active component being killed then it is likely that the standby component was killed. In this case simply try killing the other process.
If this step does not result in the active component being killed then it is likely that the standby component was killed. In this case simply try killing the other process.
After executing the kill command you can see in the csa102CompI1 application that the standby component is now active.
| /root/asp/var/log/csa102CompI1Log.latest |
|---|
|
This indicates that the standby component has taken over for the failed active component.
Looking in the csa102CompI0 application log you can see that this component was killed and has been restarted. Since csa102CompI1 took over as the active component this component now goes into the standby state.
| /root/asp/var/log/csa102CompI0Log.latest |
|---|
|
You can continue to observe this failover by alternately killing the active component.
To stop csa102 using the SAFplus Platform Console.
cli[Test:SCNodeI0:CPM]-> amsLockAssignment sg csa102SGI0
Successfully changed state of csa102SGI0 to LockAssignment
cli[Test:SCNodeI0:CPM]-> amsLockInstantiation sg csa102SGI0
cli[Test:SCNodeI0:CPM] -> end
cli[Test:SCNodeI0] -> end
cli[Test] -> bye
Successfully changed state of csa102SGI0 to LockInstantiation and exit.
Summary
This Sample Application has covered basic HA and failover, with changing the state of a component to active and standby.

