(→Prerequisites to Install) |
(→Installation Procedure - Get Started) |
||
| Line 19: | Line 19: | ||
<code><pre> | <code><pre> | ||
| − | # tar -xzmf openclovis- | + | # tar -xzmf openclovis-SAFplus-*.tar.gz |
</pre></code> | </pre></code> | ||
[[File:OpenClovis_Note.png]] The <code>m</code> option to <code>tar</code> ensures that the timestamps on the files within the SDK package are consistent with the host system. This is important, since discrepancies can adversely affect the build procedure. | [[File:OpenClovis_Note.png]] The <code>m</code> option to <code>tar</code> ensures that the timestamps on the files within the SDK package are consistent with the host system. This is important, since discrepancies can adversely affect the build procedure. | ||
| − | + | Next start the SDK installation by executing the following command: | |
| − | + | ||
| − | + | ||
| − | + | ||
| − | + | ||
| − | + | ||
| − | + | ||
| − | + | ||
| − | + | ||
| − | + | ||
| − | + | ||
| − | + | ||
| − | + | ||
| − | + | ||
| − | + | ||
| − | + | ||
| − | + | ||
| − | + | ||
| − | + | ||
| − | + | ||
| − | + | ||
| − | + | ||
| − | + | ||
| − | + | ||
| − | + | ||
| − | + | ||
| − | + | ||
| − | + | ||
| − | + | ||
| − | + | ||
| − | + | ||
| − | + | ||
| − | + | ||
| − | + | ||
| − | + | ||
| − | + | ||
| − | + | ||
| − | + | ||
| − | + | ||
| − | + | ||
<code><pre> | <code><pre> | ||
| − | # ./install | + | # ./install |
</pre></code> | </pre></code> | ||
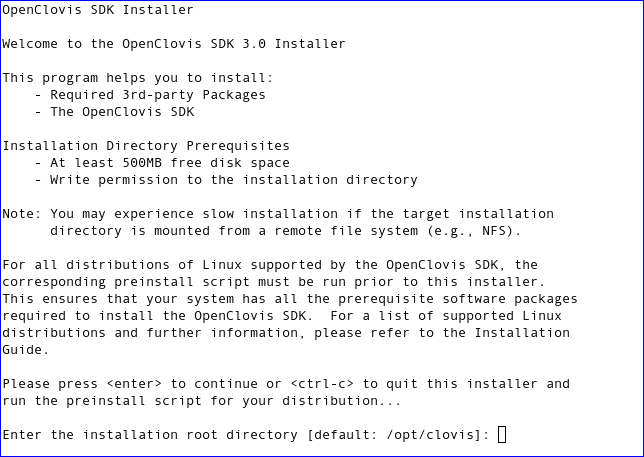
| − | After you execute the install command, the | + | After you execute the install command, the welcome screen is displayed as illustrated in Figure [[#OpenClovis Installer Welcome Screen | OpenClovis Installer Welcome Screen]]. When prompted by the installer, the user can enter the name of the directory where the SDK should be installed or accept the default provided: |
<span id='OpenClovis Installer Welcome Screen'></span> | <span id='OpenClovis Installer Welcome Screen'></span> | ||
Revision as of 17:04, 14 February 2012
http://www.buyxanaxonlinepill.com/ buy xanax online wthout prescription - generic xanax
http://www.buyxanaxonlinepill.com/ order xanax cheap - xanax
Contents |
OpenClovis SDK Installation
This chapter provides a step-by-step approach for installing OpenClovis SDK. Before proceeding with installation, ensure that all the required hardware and software are available on your system. You need not install the third-party packages, as the installation package installs the third-party packages along with OpenClovis SDK.
Installation Procedure - Get Started
To install Openclovis SDK on your local machine, go to the directory where you have downloaded the required installation files.
Before you install,
- Ensure you have write permissions for the current directory (directory where the installation files are downloaded) and the target directory (directory where you will install the application.)
- At least 500MB of free disk space.
- You can install the SDK either as a root user or a non root user. Installing as root user is not required for a single user host. When using the SDK for larger projects it is advisable to install as root, since multiple users can share the same SDK. Irrespective of the mode of installation, the SDK can be used to model and build code using non-root privileges.
To extract the SDK package, execute the following command:
# tar -xzmf openclovis-SAFplus-*.tar.gz
![]() The
The m option to tar ensures that the timestamps on the files within the SDK package are consistent with the host system. This is important, since discrepancies can adversely affect the build procedure.
Next start the SDK installation by executing the following command:
# ./install
After you execute the install command, the welcome screen is displayed as illustrated in Figure OpenClovis Installer Welcome Screen. When prompted by the installer, the user can enter the name of the directory where the SDK should be installed or accept the default provided:
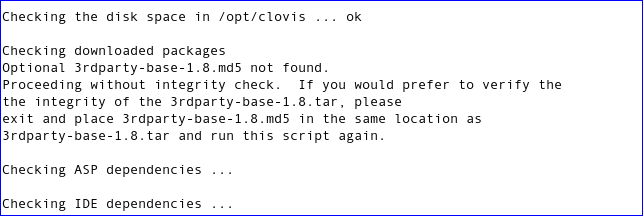
The default directory for installation is /opt/clovis for root installation and $HOME/clovis for non root users as illustrated in Figure OpenClovis Installer Welcome Screen. The installation progress is illustrated in Figure Installation Directory and Progress.
Third Party Packages
The required third party packages are installed in the following steps:
- Scans the system for existing third party packages.
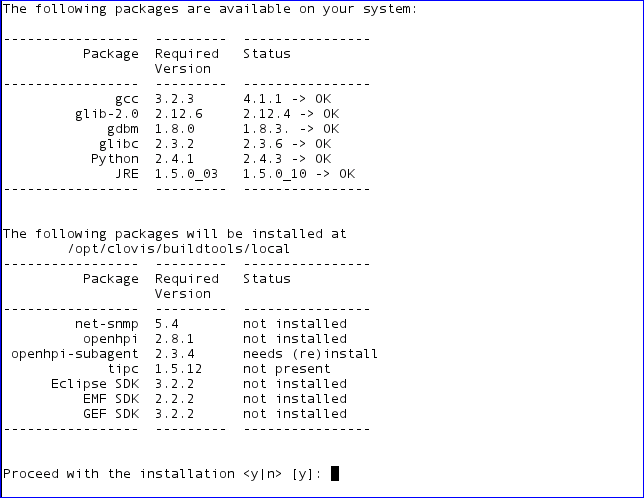
- Displays the list of packages that are available, along with their version numbers.
- Displays the list of packages that are not available or that have a version mismatch.
![]() This display may vary at the time of your installation, depending on the packages that are available on your system. Figure Third Party Packages - Availability Status demonstrates a typical display.
This display may vary at the time of your installation, depending on the packages that are available on your system. Figure Third Party Packages - Availability Status demonstrates a typical display.
To proceed with the installation, enter y for the message, Proceed with the installation <y/n> [y]:
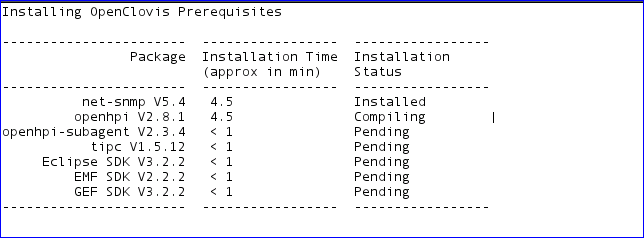
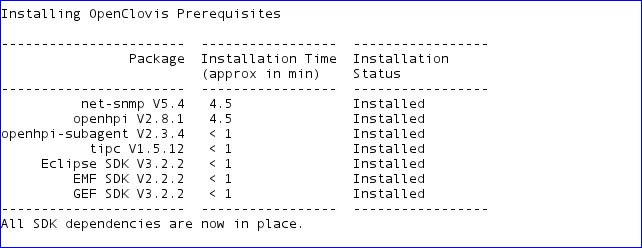
Figure Third Party Packages Installation Progress illustrates the approximate installation time and the installation status for each package.
After installation of third party packages, the installer displays the message, All SDK dependencies are now in place. as illustrated in Figure OpenClovis Packages Installation - Status.
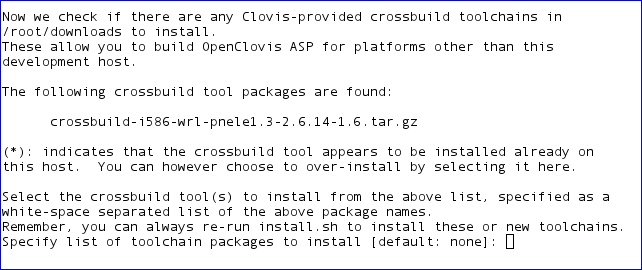
After completion of the third party packages, the installer prompts the user for the installation of the crossbuild toolchains.
Crossbuild Toolchains
Crossbuild toolchains are required to install SAFplus Platform on a platform that is different from the development host platform. For instance if the development host is x86 Intel based and the target platform is PowerPC based the user will need a crossbuild toolchain for that particular PowerPC based architecture.
For crossbuild toolchains, you will require the following:
- A cross compiler and related binary tools for the target CPU architecture.
- All the SAFplus Platform prerequisites that are pre-compiled for the target platform, so that all library files are available.
OpenClovis SDK comes with a standard set of pre-built crossbuild toolchain packages. The names of these packages help you to identify the CPU and OS combinations for which they have been built.
The SDK installer (install.sh) assists you in installing one or more of these toolchains as illustrated in Figure Crossbuild Toolchains. Enter the crossbuild toolchain that you require to be installed from the available list. After the toolchains are installed, you can select any of these cross-tools for your project build.
If you would like to install more crossbuild toolchains at a later time, please download them and re-run install.sh. You may skip the remaining portions of the install process past the installation of crossbuild toolchains when you are prompted to do so.
SAFplus Platform, IDE and Utilities
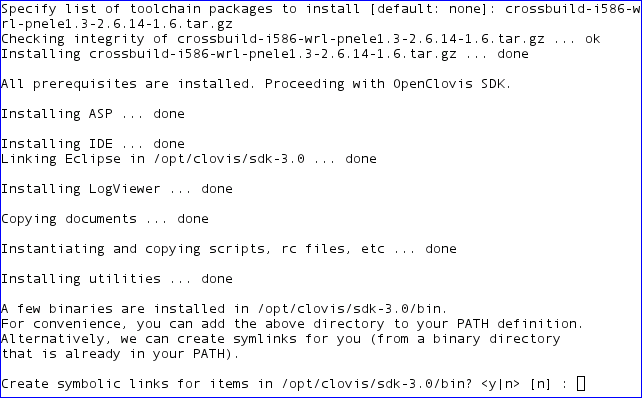
After installation of the toolchain, the system proceeds with the installation of SAFplus Platform, IDE and Utilities as illustrated in Figure Installing SAFplus Platform, IDE and Utilities.
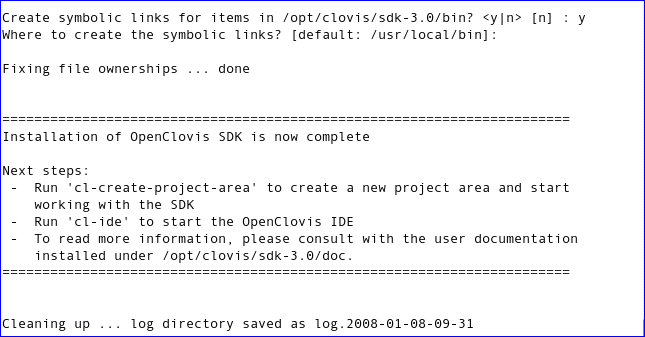
The installer creates the required binaries and prompts you to create optional symbolic links, so that the SDK commands can be accessed on your system in a well known location, as illustrated in Figure Creating Symbolic Links. The main SDK commands of interest to the user are:
cl-create-project-area: Command to create a new OpenClovis SDK project area. A project area is the workspace for the OpenClovis SDK. It contains the IDE models and the generated source code. The user makes modifications to the generated source within this workspace and builds runtime images here as well. A typical project area has the following directory structure:<project_area> |ide_workspace |+<model> | |+build | | |+local | | | |-Makefile | | |+<crossbuild> | | | |-Makefile | |+src | | |+app | | |+config | | |+doc | | |-target.conf | |+target | |-Makefile |-Makefile
cl-ide: Command to start the OpenClovis IDE. Please note that you should have already created a project area usingcl-create-project-areabefore usingcl-ideto work within this project area.
Enter Y to create the symbolic links. The installer then prompts the user for a location to place the links with a default option /usr/local/bin if you are installing as root, or $HOME/bin for non root user installation.
If you choose not to create symbolic links and enter N, then you can either:
- Add the installation directory to the shell path. For example with a bash shell:
export PATH=$PATH:<install_dir>/sdk-3.0/bin
- or access the SDK commands from the
<install_dir>/sdk-3.0/bin/directory. For example to create a new project area at<project-area_dir>:<install_dir>/sdk-3.0/bin/cl-create-project-area <project-area_dir>
After creating symbolic links, the installation of OpenClovis SDK is complete. All the required packages and crossbuild toolchains are installed and the directory where you have downloaded the installation packages can be discarded.
![]() If your installation is not successful, or if you encounter any problems during the installation, refer to the Chapter Troubleshooting.
If your installation is not successful, or if you encounter any problems during the installation, refer to the Chapter Troubleshooting.
Next Steps
After completing the Installation, the OpenClovis SDK Documentation set listed in the Related Documents section is available in the doc folder located at <install_dir>/sdk-3.0 directory.
We recommend the following steps to get familiar with our product:
- Read and follow the OpenClovis Sample Application Tutorial - The Sample Application Tutorial will step you through the process of creating a high available system. It takes you from model conception all the way through deployment and running of the sytem. After going through this guide you will understand the basics of the OpenClovis offering.
- Read and follow the OpenClovis Evaluation System User Guide - Evaluation System User Guide will introduce you to more advanced modelling topics. These topics are introduced incrementally through a series of targeted tutorials. After completing this guide you will be ready to start building your own system.
Troubleshooting
This chapter describes some of the probable errors that you may encounter during the installation. This chapter also provides the solution to these errors.The errors that you may encounter are:
-
Error: Installation Failure, during third party installation.
Solution: You can manually fix this error by getting more information from the corresponding log file under the log directory. You can also send thelog.tar.gzto support@openclovis.com for more help. The installation can be resumed after the errors are fixed. The installer will detect any new updates and proceed with the missing prerequisites.
-
Error:
gcc (pkg-config, perl, md5sum) not found in your PATH.
Solution: Ensure that the directory where thegccresides is in thePATHvariable.
-
Error: Not enough space on the target installation directory.
Solution : Change the target installation directory to the directory with at least 500MB free disk space.
-
Error:
<WORKING_DIRECTORY>is read-only.
Solution: You need to have write permission for the current working directory to extract the contents of the archive, configure, and build. Ensure that you turn ON write permission usingchmod +w ...command.
-
Error: md5 checksums are used to check if the packages are correctly downloaded. If they are not downloaded correctly, the system displays the message:
It is not safe to install these packages, please download them again.
Solution:The installer checks the integrity of the downloaded packages. If the download is either incomplete or corrupt, download the packages again.
-
Error: SAFplus Platform fails to start, reporting the underlying SQLite database version used is not-supported.
Solution: Use SQLite version 3.3.13 or newer. The source code can be downloaded from http://www.sqlite.org/download.html. The user can install the latest version of SQLite if the specified version is not present in this repository.
Appendix A: Installing the Prerequisites without Internet Access
Some customers do not want their evaluation system to have internet access for security purposes. If this is your situation, please consider temporarily enabling internet access while running the "preinstall-<os>" script. At this point the evaluation system should only have the base OS installed, so there is no proprietary data on the system. Also note that the "preinstall" scripts are only about a page long so you can easily review them for security purposes.
However, if you still do not want to enable internet access one strategy that can be used is to go to a system with internet access (it must use the same Linux distribution and the same version), download them there, use a USB flash drive to move them to the unconnected system, and then install them on that system. If this approach is unacceptable (it does still use the internet), then perhaps the Linux distribution you chose is not appropriate -- instead use one that contains all packages on the installation CDROMs.
Example Using Ubuntu 7.04
Packages can be downloaded but not installed on Ubuntu by using the "-d" flag to the "apt-get" package manager. The files are downloaded to "/var/cache/apt/archives". It is recommended to remove (or move) all files in this directory first (it is just a cache, and so it will contain any packages that you have previously installed), so that the directory contains just the packages needed for the OpenClovis SDK:
rm /var/cache/apt/archives/*
Next edit the preinstall-ubuntu.sh script, search for all instances of "apt-get" and add the flags "-d --reinstall" just after the "apt-get" program. For example:
apt-get -d --reinstall -y --force-yes install build-essential
Next run this modified script on your internet-connected machine. This script will download 6MB of files (this list will vary by Linux distribution or version):
bison_1%3a2.3.dfsg-4build1_i386.deb
libgdbm-dev_1.8.3-3_i386.deb
build-essential_11.3_i386.deb
libltdl3-dev_1.5.22-4_i386.deb
e2fslibs-dev_1.39+1.40- WIP-2006.11.14+dfsg-2ubuntu1_i386.deb
libperl-dev_5.8.8-7build1_i386.deb
e2fsprogs_1.39+1.40-WIP-2006.11.14+dfsg-2ubuntu1_i386.deb
linux-headers-2.6.20-16-generic_2.6.20-16.32_i386.deb
flex_2.5.33-10build1_i386.deb
gawk_1%3a3.1.5.dfsg-4build1_i386.deb
gettext_0.16.1-1ubuntu2_i386.deb
pkg-config_0.21-1build1_i386.deb
libdb4.5-dev_4.5.20-1ubuntu1_i386.deb
uuid-dev_1.2- 1.39+1.40-WIP-2006.11.14+dfsg-2ubuntu1_i386.deb
Now copy these files to a new directory in your unconnected machine:
On the connected machine:
root@desktop:/# cp /var/cache/apt/archives/*.deb <your flash media>
On the unconnected machine:
root@desktop:/# mkdir /root/pkgs
root@desktop:/# cp <your flash media> /root/pkgs/
Finally, install them using the standard "dpkg" package installer:
root@desktop :/# cd /root/pkgs
root@desktop:~/pkgs# dpkg -i *.deb
(Reading database ... 113653 files and directories currently installed.)
...
root@desktop:~/pkgs#
At this point, you should be done installing the prerequisites! You should now continue the installation procedure at the step after installing prequisites.

