Contents |
Software Management
Software Management consists of the creation and management of software bundles, software version tracking, deployment, removal, and upgrade. The software management functionality is available as a set of Python APIs delivered as part of the AWD API. Individual function documentation is available in the AWD API reference guide.
Software Lifecycle
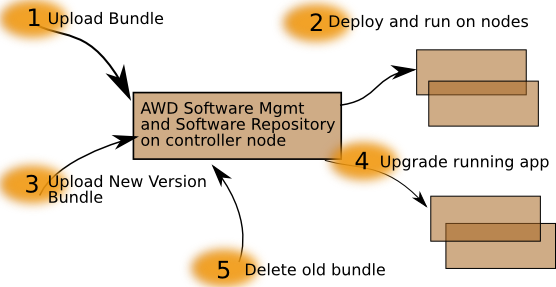
This section describes the application software lifecycle from the perspective of the AWD GUI for clarity. However, understand that AWD APIs exist to access every stage of this process independently of the GUI and of other stages. Therefore an independently written EMS can selectively modify or override any or all of these stages.
1. Upload: Application Software is delivered in the form of a "bundle", which is a tarred, gzipped (.tgz) archive file containing the application. The application author generates this bundle as part of the application "build" process. This bundle file is uploaded to the ARD server (controller nodes) and is stored in the AWD's software repository.
2. Deployment: Once the application software is in the AWD bundle manager, it can be deployed to nodes. In this step the software is automatically copied to each node and the appropriate SAF AMF Entities are created to model the application
3. New Version: A new version (bugfix or major change) of the application is delivered as another bundle in the same manner as the original upload.
4. Upgrade: An upgrade can occur when a newer version of application software exists in the bundle manager then is running on the nodes. The user initiates an upgrade, and can do so selectively -- that is, for particular deployments (service groups) and not others. Multiple upgrades can be ongoing at the same time.
5. Removal: When no deployments are currently using a particular version of application software, that software can be deleted from the bundle manager.
Software Library Overview
AspApp
Software can be provided to the AWD in a single bundle file, which is essentially a Linux .tgz (gzipped tar archive) that contains specific files and a well-defined directory layout. Most importantly, at the top level there exists an XML file called "appcfg.xml". This file describes the application contained in the bundle file, and includes details such as its current version and required redundancy model (see Application Bundle Format ).
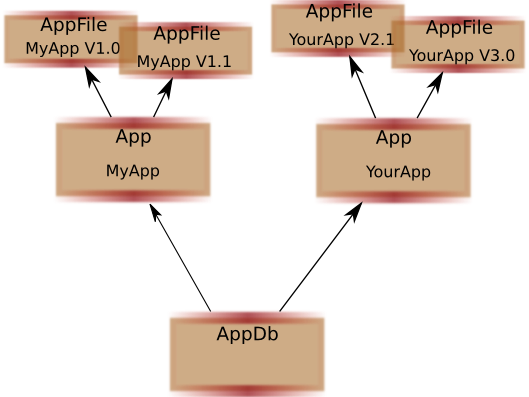
The "aspApp" module manages bundles in the system. It is notified of a bundle file via and API call that simply takes the name of the file as a parameter (AppDb.NewAppFile()). The module then opens the file, parses the appcfg.xml file and creates an "AppFile" object that corresponds to this software bundle. This object contains data members and methods that make it easy for an application to access all information about the bundle. The module also places this "AppFile" object into a global database of all application bundles, so that it is easy to understand its relationship to other bundles that are also in the system (such as to prior versions of the same application). It also connects this application bundle to the existing SAFplus Platform state, so you can easily determine whether this application bundle has already been deployed on the system and exactly which Service Groups are running it.
AppDeploy
The "appDeploy" module handles software deployment. It contains a single API called "deploy" that takes some data members from an AppFile object (basically the bundle extraction location and the deployment configuration), a list of nodes to deploy to, and some flags controlling various aspects of the operation. The function does not take the AppFile directly for two reasons:
- It is usable on software that is not part of the software bundle management.
- You may want to modify the software's deployment configuration.
Using this function, you may either copy the software onto all specified nodes, create the required SAF AMF entities in the information model, or do both simultaneously (depending on the flags passed).
You may also select whether you want an exception raised upon error (such as inability to deploy the software to a node), or whether you want to continue, returning all issues at the end of the operation.
All together, this results in an incredibly powerful but simple deployment facility!
Application Removal
Applicaton removal is extremely simple. You simple choose the SAF entities to be deleted, and call the "DeleteEntities" member of the aspAmf module. The system makes sure that applications are shut down before deletion, etc. And to make the process even simpler, there is a helper function in the clusterinfo module called "getDependentEntities" that will return a list of all entities that are wholly dependent on the entity passed in. These two functions can be used in conjunction to create a very powerful application or entity removal system. For example, to delete a Service Group named "mySg" the following code could be used:
entities = ci.getDependentEntities(ci.entities["mySg"])
amf.DeleteEntities(entities)
[In the code above, "ci" is the global clusterinfo database located at "clusterinfo.ci" and "amf" is an instance of an aspAmf session (aspAmf.Session())].
This will delete the Service Group and all Service Units, Components, Service Instances, and Component Service Instances within that Service Group.
This idiom works for all SAF entities. For example, to delete a node named "myNode" the exact same code could be used (other then the entity name):
entities = ci.getDependentEntities(ci.entities["myNode"])
amf.DeleteEntities(entities)
This will delete the node and all Service Units and Components running on that node. If a Service Group is running on several nodes including the deleted node, only the Service Unit and Components on the node will be affected -- the Service Group does not need to be taken out of service, and work (SAF SIs) will automatically be transferred to Service Units that are not being deleted!
Application Upgrade
Application Upgrade is implemented in the "upgrade" module. This module contains an upgrade manager (UpgradeMgr) that is essentially a container for objects that describe the upgrade state of individual Service Groups (UpgradeSg).
To initiate an upgrade one first must provide the software bundle file containing the new version to the bundle manager (aspApp, described above). Next, one simply adds the service group to the upgrade manager by calling the UpgradeMgr.add() member function with the service group entity (accessed via clusterinfo). At this point an UpgradeSg object is created but not yest started. It is now possible to configure the specifics of the upgrade operation by calling UpgradeSg member functions and modifying member variables. For the upgrade algorithm (single step or rolling) can be selected by modifying the "upMethod" member variable.
Finally, an upgrade can be initiated by calling the UpgradeSg.Upgrade() member function. This function accepts as a parameter an AppFile (see above for a description of AppFile) object that describes exactly what target software to upgrade to. The upgrade system takes care of automatically deploying the software to the required nodes, shutting down Service Units, and deleting and recreating SAF AMF entities.
Its THAT simple!
Additional Upgrade APIs
There are also additional APIs that allow a programmer to have more control over the upgrade process. The "Upgrade" member function is actually a thin wrapper around a "generator" function (http://docs.python.org/tutorial/classes.html#generators) that "returns" each time a single step in the upgrade is complete. So you can directly call the generator function if you need to execute some code at each step in the upgrade process. The AWD GUI uses this feature to implement step-by-step guided upgrade.
The upgrade objects are also derived from a single class called ChangeTracker. The ChangeTracker class has an API that allows threads to block until a state change has occurred (ChangeTracker.changeWait). As the upgrade proceeds, waiting threads are unblocked each time the upgrade changes the state of the cluster, allowing application code to be written to observe these state changes. For example, the AWD GUI uses this technique to report the upgrade state changes to the web browser as they occur, allowing the user to watch the upgrade's progress.


